Well it was ground hog day yesterday and regardless of PETA trying to replace him with a robot weather forecasting device, he saw his shadow and bodes 6 more weeks of winter weather. Hopefully I’m in time to teach you a couple of techniques to make a quick TEMPORARY repair to stop the flow before you have to start building an ark and calling in the animals in pairs much less the idea of your furniture and personal belongings floating in cold water and amidst icebergs.
A frozen pipe can happen anytime and when “Murphy’s Law” prevails, as it usually does, it will be In the worst place possible. This means in a nearly inaccessible place and where the most damage will be inflicted. This being said, fast action is essential so for God’s sake, hopefully you’ve turned off the main water supply before you started searching the internet and found me. If not…STOP READING AND GO TURN IT OFF AT THE MAIN WATER SUPPLY. Now read on.
Most leaks occur at pipe fittings. More serious fractures can occur in other locations and often
result from corrosion, dents or freezing. Temporary fixes generally involve using epoxy patches
or clamps. Permanent repairs usually involve repair or compression couplings, or replacement
of the damaged fitting or pipe section altogether. This will help you make quick fixes in
the event of an emergency then you can make a list of what you will need to make a permanent repair or call a plumber.
IMPORTANT: Never leave a temporary fix installed behind a permanent wall. Remember,
quick fixes are only temporary solutions and you should repair a leak properly as soon as possible.
There are two basic ways to effect a temporary patch, epoxy putty or a patch made from a rubber patch or when push comes to shove an old bicycle tube. Here is a synopsis of each method:
EPOXY
1. Turn off the water supply upstream of the leak.that the area to be patched is clean and dry so that
the epoxy will properly adhere to the pipe.
2. Tear off enough plumber’s epoxy putty to fully cover the surface around the leak. Knead the putty until it
is pliable enough for application.
3. Apply the epoxy putty according to the manufacturer’s instructions.
4. Once the putty has fully cured, turn on the water and inspect for leaks.
5. Alternative: Purchase an epoxy and tape Pipe Repair Kit and follow the manufacturer’s instructions.
PATCH /Quick Fix Using Clamps
1. Clean the area around the rupture.
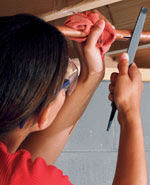
2. File down any sharp edges that might cut through the patch
3. Wrap the area with the patch and follow package instructions or wrap the bicycle tube tightly around the break and clamp on both ends.
SKILL LEVEL: novice
TOOLS NEEDED:
Tape measure
Screwdriver (or)
Nut driver
Water-pump pliers
Flat metal file
Scissors
Pipe repair kit (or)
Plumber’s epoxy putty (If you live in a very cold area it would be a great idea to keep one of these on hand at all times)
Repair clamps
Hose clamps
½ inch neoprene rubber or bicycle tube
The details for these repair procedures came from the Home Depot site which has great instructions for all kinds of home repairs. Full credit is given to HD for this information and the pictures included herein. To view the full HD article, go to:
http://www.homedepot.com/webapp/wcs/stores/servlet/ContentView?pn=KH_PG_BM_PL_PI_Emergency_Pipe_Repair&langId=-1&storeId=10051&catalogId=10053


No comments:
Post a Comment