I have approached the “Green” living concept from most every directiom. I’ve researched and blogged on eco friendly ways to clean your house, on water saving plumbing fixtures, how to conserve water and electricity and the list goes on and on. While reading and researching for today’s blog I ran across a list of 19 online sites that appear to have all the answers and approached to living “green”. So if you’ve been straddling the fence, you been trying to find answers to help you make up your mind and AL Gore and I haven’t pushed you over the edge then here’s answers for EVERYTHING you ever wanted to lnow about the subject.
The Green 10: Top Online Sources for the Aspiring Ecophile, By Erin Loechner of Design for Mankind)
“Sure, you've heard of the usual suspects (treehugger.com and thegreenguide.com to name a few), but there are some missing links in your chain of eco-fabulousness. Here, ShelterPop rounds up a few of our favorite green online home sources you've probably never heard of. Break out the granola and bookmark away!”
1. Greenzer.com
A shopping aggregator, Greenzer leads you to the best eco-friendly retailers on the web. You'll save time, energy and reduce that carbon footprint...all in your undies!
2. GoodGuide.com
A beta site that uses government and environmental group research, Good Guide rates household items and foods according to which are healthier for your body and our Earth.
3. SustainableBusiness.com
Sustainable Business lists top sustainable stocks in today's economy and aids in tracking the performance of your favorite green corporations.
4. CarbonFund.org
A nonprofit carbon credit organization with over 450,000 members, CarbonFund offers carbon footprint calculators and additional tools to support energy efficiency, renewable energy and reforestation projects around the world.
5. Earth911.com
This handy site lets you search for recycling centers by entering your zip code or street address.
6. DineGreen.com
A brilliant resource that allows you to search by restaurant category, location or keywords to spot eco-friendly eateries in your hometown.
7. Ecorazzi.com
Our list wouldn't be complete without a bit of indulgence, would it? Find out how your favorite actors and musicians fare in their quest to save the planet.
8. Ewg.org
Check how toxic that new mascara is with Environmental Working Group's searchable database of more than 42,000 cosmetic products.
9. EcoGeek.org
For the gadget lover in your family, EcoGeek offers the latest information on new technological advances and green innovations.
10. Grist.org
An information aggregator, Grist lists daily headlines on environmental topics, making this site your one-stop destination for all things green.
I know that this would appear to cover the full gamut on the subject but if you know of more interesting and enlightening sites how about letting us know. Use the comment section below and I’ll revoew the sites and get the word out.
Sunday, February 7, 2010
Thursday, February 4, 2010
10 Quick Updates for yor Kitchen
In past I have discussed various short cuts to update a bathroom, your house to make it ready to sell, to freshen up a bathroom, a bedroom and many other approaches to week end DIY projects. Two recent projects, one in my own kitchen and on that my best friend (Crash & Burn Hennecy) did his, brought to mind some ideas to pass on. Here are 10 things you can do to update your kitchen without having to get one of those now non-existent home equity loans. I will include some pics and details of our two projects also.
1. Update Your Cabinetry Hardware
These small items say big things about your kitchen style. Changing out your old knobs and pulls to brushed nickel or bronze will create a whole new decorative touch. This was one of the first things we did to my little Florida home where I live now. It’s a typical 1980’s manufactured home and the kitchen was still as it was built. A quick look through Ebay found some brushed contemporary pulls at a bargain price. I think we spent less than $100 for all of them (see pic in #10 )
2. Repaint The Walls
Nothing changes the face of a room like a fresh coat of paint. A splash of color can help set a new tone for your kitchen style - warm reds and yellows for a Tuscan feel, neutrals to make a traditional classic or vibrant greens and blues to modernize your look. Don’t be afraid of color. Avoid dark colors for a small space.Cost for my kitchen, $20 gallon of paint and a weekend
 3. Change Out Window Treatments
One of the first changes that will get people talking is new window treatments. There are many fabrics and materials to choose from, including bamboo, roman shades or a bold graphic print. I have gone with plantation style shutters throughout the entire house. Fabric curtains in a kitchen are hard to keep clean and have an old fashioned look. I found my whole house of plantation shutters (pic on right) on “Craigslist” (11 sets new still wrapped) with a retail value of $3800 for (pic on right) $250. An unfortunant result of a foreclosure sale. Although you may not find that good of a deal I see deals online most every week
 4. Put Up Some Shelves
Installing shelves is an easy, innovative way to add space with a decorative touch. New wooden or glass shelves over the sink or next to your cabinetry will allow you to clear counter space from small appliances you don't use everyday. You can also showcase decorative and sentimental items on your new shelves. I took it a step further and solved an awkward corner formed by the refrigerator and an oddly angled wall. I simply went to the “Habitat for Humanity” recycle store and bought a small based cabinet. Made a top out of plywood covered in ceramic tile. Total cost less than $200. Note that I made the back side with a hang over for barstools and place to tuck the dogs dishes and the trash can.
5. Replace Your Faucets
It's one of the most frequently used items in a kitchen, so it should be one you love. You can update your faucet relatively inexpensively, adding a refreshed look to your sink area and also lowering water and energy costs. My friends at National Builder Supply have hundreds to choose from priced for ANY budget.
6. Sweep It Under the Rug
One way to update the look of your floors without the cost of new flooring is with a rug. You can find many rugs that are durable to high foot traffic, but also attractive to compliment your kitchen style. Painted floors have also been around since pioneer days before floor coverings were ever invented. Get creative and paint a design or border on a tired or worn out floor.
7. Set The Mood With New Lighting
Make your kitchen a friendly, inviting space with a new lighting system. Consider updating the existing fixture or installing track lighting. You can also add ambiance with under-the-cabinet task or puck lights that are easy to install. Pendant lights over a bar area or sink can also add a lot to the décor as well as needed extra light. This is another thing to check NBS for. They are a Progress Lighting distributor.
 8. Put Up a Faux Backsplash
You don't have to take on a tiling extravaganza to refresh the little space over your sink. Add galvanized steel flat sheets as a backsplash and make a sleek, seamless effect that compliment your appliances. Although don’t be afraid to tackle a ceramic tile backsplash. Here is what Mike did in his kitchen one weekend.
Here is the process in his own words:
"Our backsplash was not only plain and white it had some repair work that had been done that left the surface with uneven swirls of drywall compound. In a word it was ugly. After a couple of visits to our big box home centers we chose a travertine tile in a 2"x4" subway pattern. We had wanted glass tile but could not justify the cost. Our compromise was to put a glass mosaic tile accent insert in the travertine. This gave us some of the glass tile we wanted but kept our cost down. I have limited experience doing any tile work but it is something that the average person can tackle with a little patience. A premix mastic was used to adhere to wall and a no-seal grout was used that eliminated the need to seal the grout. However since travertine is covered with tiny holes, and indentations it was necessary to seal it with a stone seal prior to applying grout. If this had not been done the grout would have filled in all the texture of the travertine. This made for easy clean up and no problems having to remove grout that adhered to the surface of the travertine tiles. Does it look like a professional tile job ? Probably not. Is the wife happy ........... yes!" Total material cost..$215.00.
9. Add a Kitchen Cart
Your kitchen can appear more spacious with less items on the countertops. A small kitchen cart can house small appliances and cookware for easy access and free up counter space from clutter. Here is where you can shop around and find one at many of the big box stores or on Craigslist or simply improvise one utilizing a surplus base cabinet on wheels with a top that matches your existing kitchen counter or simply butcher block. Use the cart as a center island and roll it out of the way when you need more floor space.
 10. Refinish Your Cabinets
You'll be surprised how easy it can be to reface your cabinets. Try a faux finish for a rich, antique look. Add some detailed painting to create highlights and shadows that give the sense of depth. Or take out the center face of a cabinet door and install a glass front. When replaced the cabinet hardware in my little kitchen we painted the cabinets a warm cocoa brown, giving a dinky little kitchen a warmer look.
1. Update Your Cabinetry Hardware
These small items say big things about your kitchen style. Changing out your old knobs and pulls to brushed nickel or bronze will create a whole new decorative touch. This was one of the first things we did to my little Florida home where I live now. It’s a typical 1980’s manufactured home and the kitchen was still as it was built. A quick look through Ebay found some brushed contemporary pulls at a bargain price. I think we spent less than $100 for all of them (see pic in #10 )
2. Repaint The Walls
Nothing changes the face of a room like a fresh coat of paint. A splash of color can help set a new tone for your kitchen style - warm reds and yellows for a Tuscan feel, neutrals to make a traditional classic or vibrant greens and blues to modernize your look. Don’t be afraid of color. Avoid dark colors for a small space.Cost for my kitchen, $20 gallon of paint and a weekend

One of the first changes that will get people talking is new window treatments. There are many fabrics and materials to choose from, including bamboo, roman shades or a bold graphic print. I have gone with plantation style shutters throughout the entire house. Fabric curtains in a kitchen are hard to keep clean and have an old fashioned look. I found my whole house of plantation shutters (pic on right) on “Craigslist” (11 sets new still wrapped) with a retail value of $3800 for (pic on right) $250. An unfortunant result of a foreclosure sale. Although you may not find that good of a deal I see deals online most every week

Installing shelves is an easy, innovative way to add space with a decorative touch. New wooden or glass shelves over the sink or next to your cabinetry will allow you to clear counter space from small appliances you don't use everyday. You can also showcase decorative and sentimental items on your new shelves. I took it a step further and solved an awkward corner formed by the refrigerator and an oddly angled wall. I simply went to the “Habitat for Humanity” recycle store and bought a small based cabinet. Made a top out of plywood covered in ceramic tile. Total cost less than $200. Note that I made the back side with a hang over for barstools and place to tuck the dogs dishes and the trash can.
5. Replace Your Faucets
It's one of the most frequently used items in a kitchen, so it should be one you love. You can update your faucet relatively inexpensively, adding a refreshed look to your sink area and also lowering water and energy costs. My friends at National Builder Supply have hundreds to choose from priced for ANY budget.
6. Sweep It Under the Rug
One way to update the look of your floors without the cost of new flooring is with a rug. You can find many rugs that are durable to high foot traffic, but also attractive to compliment your kitchen style. Painted floors have also been around since pioneer days before floor coverings were ever invented. Get creative and paint a design or border on a tired or worn out floor.
7. Set The Mood With New Lighting
Make your kitchen a friendly, inviting space with a new lighting system. Consider updating the existing fixture or installing track lighting. You can also add ambiance with under-the-cabinet task or puck lights that are easy to install. Pendant lights over a bar area or sink can also add a lot to the décor as well as needed extra light. This is another thing to check NBS for. They are a Progress Lighting distributor.

You don't have to take on a tiling extravaganza to refresh the little space over your sink. Add galvanized steel flat sheets as a backsplash and make a sleek, seamless effect that compliment your appliances. Although don’t be afraid to tackle a ceramic tile backsplash. Here is what Mike did in his kitchen one weekend.
Here is the process in his own words:
"Our backsplash was not only plain and white it had some repair work that had been done that left the surface with uneven swirls of drywall compound. In a word it was ugly. After a couple of visits to our big box home centers we chose a travertine tile in a 2"x4" subway pattern. We had wanted glass tile but could not justify the cost. Our compromise was to put a glass mosaic tile accent insert in the travertine. This gave us some of the glass tile we wanted but kept our cost down. I have limited experience doing any tile work but it is something that the average person can tackle with a little patience. A premix mastic was used to adhere to wall and a no-seal grout was used that eliminated the need to seal the grout. However since travertine is covered with tiny holes, and indentations it was necessary to seal it with a stone seal prior to applying grout. If this had not been done the grout would have filled in all the texture of the travertine. This made for easy clean up and no problems having to remove grout that adhered to the surface of the travertine tiles. Does it look like a professional tile job ? Probably not. Is the wife happy ........... yes!" Total material cost..$215.00.
9. Add a Kitchen Cart
Your kitchen can appear more spacious with less items on the countertops. A small kitchen cart can house small appliances and cookware for easy access and free up counter space from clutter. Here is where you can shop around and find one at many of the big box stores or on Craigslist or simply improvise one utilizing a surplus base cabinet on wheels with a top that matches your existing kitchen counter or simply butcher block. Use the cart as a center island and roll it out of the way when you need more floor space.

You'll be surprised how easy it can be to reface your cabinets. Try a faux finish for a rich, antique look. Add some detailed painting to create highlights and shadows that give the sense of depth. Or take out the center face of a cabinet door and install a glass front. When replaced the cabinet hardware in my little kitchen we painted the cabinets a warm cocoa brown, giving a dinky little kitchen a warmer look.
Wednesday, February 3, 2010
Emergency Quick Fixes for Frozen or Leaking Pipes
Well it was ground hog day yesterday and regardless of PETA trying to replace him with a robot weather forecasting device, he saw his shadow and bodes 6 more weeks of winter weather. Hopefully I’m in time to teach you a couple of techniques to make a quick TEMPORARY repair to stop the flow before you have to start building an ark and calling in the animals in pairs much less the idea of your furniture and personal belongings floating in cold water and amidst icebergs.
A frozen pipe can happen anytime and when “Murphy’s Law” prevails, as it usually does, it will be In the worst place possible. This means in a nearly inaccessible place and where the most damage will be inflicted. This being said, fast action is essential so for God’s sake, hopefully you’ve turned off the main water supply before you started searching the internet and found me. If not…STOP READING AND GO TURN IT OFF AT THE MAIN WATER SUPPLY. Now read on.
Most leaks occur at pipe fittings. More serious fractures can occur in other locations and often
result from corrosion, dents or freezing. Temporary fixes generally involve using epoxy patches
or clamps. Permanent repairs usually involve repair or compression couplings, or replacement
of the damaged fitting or pipe section altogether. This will help you make quick fixes in
the event of an emergency then you can make a list of what you will need to make a permanent repair or call a plumber.
IMPORTANT: Never leave a temporary fix installed behind a permanent wall. Remember,
quick fixes are only temporary solutions and you should repair a leak properly as soon as possible.
There are two basic ways to effect a temporary patch, epoxy putty or a patch made from a rubber patch or when push comes to shove an old bicycle tube. Here is a synopsis of each method:

EPOXY
1. Turn off the water supply upstream of the leak.that the area to be patched is clean and dry so that
the epoxy will properly adhere to the pipe.
2. Tear off enough plumber’s epoxy putty to fully cover the surface around the leak. Knead the putty until it
is pliable enough for application.
3. Apply the epoxy putty according to the manufacturer’s instructions.
4. Once the putty has fully cured, turn on the water and inspect for leaks.
5. Alternative: Purchase an epoxy and tape Pipe Repair Kit and follow the manufacturer’s instructions.
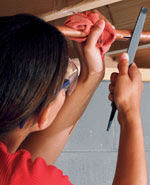
PATCH /Quick Fix Using Clamps
1. Clean the area around the rupture.
2. File down any sharp edges that might cut through the patch
3. Wrap the area with the patch and follow package instructions or wrap the bicycle tube tightly around the break and clamp on both ends.
SKILL LEVEL: novice
TOOLS NEEDED:
Tape measure
Screwdriver (or)
Nut driver
Water-pump pliers
Flat metal file
Scissors
Pipe repair kit (or)
Plumber’s epoxy putty (If you live in a very cold area it would be a great idea to keep one of these on hand at all times)
Repair clamps
Hose clamps
½ inch neoprene rubber or bicycle tube
The details for these repair procedures came from the Home Depot site which has great instructions for all kinds of home repairs. Full credit is given to HD for this information and the pictures included herein. To view the full HD article, go to:
http://www.homedepot.com/webapp/wcs/stores/servlet/ContentView?pn=KH_PG_BM_PL_PI_Emergency_Pipe_Repair&langId=-1&storeId=10051&catalogId=10053
Monday, February 1, 2010
Pros and Cons...Granite vs Concrete Countertops
I have, in the past blogged about how to choose a countertop material, briefly outlining the pros and cons of the more popular choices. I also have written about easy inexpensive things to do to fix up your kitchen, color trends of kitchens today, how to choose a new faucet and the list goes on. I have recently added a “search” feature to the blogsite, that you may not have noticed. It is at the very top of the page on the right. If you are here seeking an answer to specific question or details on a certain subject try searching for one of my more than 170+ blogs. With kitchens and countertops in mind I ran across to articles by Jaime Derringer of Design-Milk, about the pro and cons of concrete versus granite for countertops and found the information useful and informative. The entire content of those articles can be seen at:
http://www.shelterpop.com/2009/10/23/granite-countertops/
and
http://www.shelterpop.com/2009/10/23/concrete-countertops/
The following is my abridgement and comments on those articles. I hope you find them useful and if you still have questions use the “search” function I discussed above. My thanks and full credit is given to the author for the information.
GRANITE
Granite, granite, granite. That's all you ever hear these days when it comes to kitchen and bathroom countertops. Well, there is a reason why everyone wants granite in their kitchens. It's almost a perfect countertop surface, and here's why:
PROS
1. Granite is an igneous rock, formed under high heat. Its structure is crystalline, not layered like sedimentary rock. It's made of quartz with a variety of feldspar minerals and mica. This makes granite extremely strong and durable, and many times impervious to stains, scratches and dents. Please note this says “many times” impervious to stains.
2. You can place hot pots and pans directly on the surface of granite countertops without damage.
3. Granite also holds its value, so even though it is a pricey investment, you should see a 100% return. 4. Since granite is a natural stone, every slab is different. It also comes in hundreds of colors and patterns, so you've got quite a selection to choose from.
CONS
1. Because of its strength and durability, granite is also very heavy. Be sure that your cabinets are reinforced to hold the weight of granite. This can be an extra, unexpected expense.
2. But be sure you love your choice, because granite countertops need to be professionally installed -- sorry DIY'ers, you can't do this one alone. Once installation is complete, it is nearly impossible to remove granite without damaging your cabinets and backsplash.
3. My personal experience has found that even if properly sealed and maintained granite will stain. It absorbs water and can look stained for house and grease and food coloring can be a permanent stain on some granites
Sealing, Cleaning and Care: Granite is very easy to clean by using a mild detergent and warm water. Many times, it will just wipe clean with a wet sponge. Some granites need to be sealed once they have been installed. Be sure to ask a professional if your granite requires a sealant. If you do not use a permanent sealer, you will likely need to reseal your granite every year. It's not all that bad, just about 30 minutes worth of work to keep your stone looking polished and brand new.
How Does It Measure Up? Granite is one of the most desired countertop surfaces for many reasons. It's luxurious, expensive and lasts a lifetime. Compared with most other surfaces, it comes out on top. The only downside is the price. There are other surfaces that look similar to granite but cost much less, including engineered stone and laminate. However, these won't last as long and may damage more easily. If you're really looking for the top of the line product, and won't settle for anything less than the best, granite countertops are definitely the right choice.
CONCRETE
I was watching HGTV the other day and homeowners were creating their own concrete countertops for their kitchen. I immediately thought, "Wow, out of all the possible materials why would they choose concrete?" After doing some research I can confidently say: many reasons.
If you think that the only people who could possibly own a concrete countertop in their kitchen are free-spirited artists living in some cold loft in the city, then you couldn't be more wrong! Concrete is no longer the cold, damp surface that once lived in your basement walls. It's hip, it's chic and it's everywhere. Concrete is basically cement, made of water, sand, pigment and dry mix. You can make your own or you can purchase concrete countertop mixes from professional builders or home improvement stores.
PROS
1. It has an industrial modern look, which many homeowners are going for these days.
2. It's basically cement, so you know that the surface is hard and can take quite a bit of wear and tear.
3. The customization and uniqueness of each piece that is made. You can add just about anything you want into the concrete mixture from recycled glass to glitter.
CONS
1. Although concrete countertops can withstand high temperatures, placing hot pots directly on a concrete countertop is not recommended.
2. You should avoid dragging knives on the surface as well. Spills should be cleaned up as quickly as possible.
3. Cleaning up is easy with just soap and water. Stay away from abrasive cleaners, and anything containing bleach or ammonia because they may damage the sealant.
Sealing, Cleaning and Care: Concrete countertops are similar to many other surfaces in that they need to be sealed. Sealing not only protects the surface but helps increase its durability and maintain its color. It is also recommended that the homeowner use a coat of wax every few months to help prevent damage or moisture buildup.
How Does Concrete Measure Up?: Like marble, granite, soapstone and butcherblock, concrete holds up just as well when treated with care. While it may not have the heat resistance of granite or the scratch resistance of marble it lasts just as long. It is more heat resistant than soapstone and butcherblock countertops however, but it is always wise to err on the side of caution and use a trivet.
DIY Your Own Concrete Countertop: The best part of owning a concrete countertop isn't in the owning but in the making! You can DIY your own concrete countertop. When's the last time someone told you to go to the quarry and DIY your own granite counter?! Check out this great step-by-step tutorial on DIY Network
http://www.diynetwork.com/how-to/how-to-create-and-install-concrete-countertops/index.html
Also, over on Instructables, one DIY-er shows you how he created his very own concrete countertops
http://www.instructables.com/id/Concrete-Countertops-for-the-Kitchen---Solid-Surfa/
and see the whole process.
Subscribe to:
Posts (Atom)